• Home
  • Reviews
    • Eyeshadow
    • Eyeliner
    • Foundation
    • Lipstick
    • Blush
    • Bronzer
    • Highlighter
    • Skincare
    • Hair
  • Project Pan
    • Pan Those Eyeshadows
    • Pan That Palette
    • Pan In Everything
    • Project Level Up
  • Style
    • OOTD
    • Accessories
    • Nail Art
  • Brands
    • Biya
    • COLOURPOP
    • Essence
    • Etude House
    • Ever Bilena
    • Focallure
    • IMAGIC
    • MOIRA
    • Perfect Diary
    • theBalm
    • UCANBE
    • Vice Cosmetics
    • ZEESEA
facebook twitter instagram instagram Email

Delightful Illusions


          Hey, guys! How are you? I've got  pretty much long vacation from work starting todqy until Sunday because we are celebrating the Holy Week. It's spiritual practice of Roman Catholics, and other religions who believe in this season , where we observe fasting and abstinence. You might see posts from this blog more often now; I have already finished my subjects for my master's degree and I have just to take my Comprehensive Exam in August in order to proceed to my thesis. This is such a relief for me, guys. I have been working so hard for the last three years; having a work on weekdays and going to school on Saturdays was so hard I almost gave up. Anyways, I will sharing with you a nail art that I have came up with last month. February is the season of proms in the Philippines; I was supposed to post last month but I wasn't able to. If you are interested on how I achieved this design, just keep on reading.

          I was inspired by the Bobbie Royal Caviar Collection in Gorgeous Princess. It was a nail set with a shimmery black nail polish with multi-colored caviar pearls. I believe these came out way back in 2014 and I'm not sure if you can still get them on the market. I was curious as to why a princess would wear a black nail polish? Typically, princesses are loaded with pink and purple clothes and other things, right? How could this set represent a "gorgeous princess"?  A princess in black sounds so gothic. Haha! ☺ I thought that this set was perfect for a masquerade-themed party; I just have to add some jewels and decorations to make it look more alluring. I have decided to mimic a crown for this design.


          Clean nails are happy nails. Clean your nails first before heading to a nail art session. Put some glue around your nails, making sure not touch the nail itself. This will ruin your nail design once you remove the glue on the later part. Why should we put glue? So that it will be easier to clean the mess after you're done putting your nail polish. Let it dry for a while so it won't mix with the nail polish.


You will be needing these items for the design:
  • Any black nail polish would do
  • Caviar pearls - any color would do
  • Nail gems - you could find these on department stores and craft stores
  • Nail tattoos - you could find these on department store or novelty stores
  • Glue - for cleaning up the mess later on
  • Water - for the nail tattoos
  • Scissor - for cutting the nail tattoos
  • Patience and perseverance!

          This is the closer look of the caviar pearls. A combination of blue, green and pink pearls is kinda cute, eh? 😉

To achieve the nail design, follow these simple steps:

  1. Apply a base coat of your choice. Let it dry for a while, and apply a black nail polish.
  2. While the lacquer is still wet and sticky, choose a gem of your taste and press it hard on your nails. Put in a higher position so there's still a space for the nail tattoo later. As you can see on the picture, I have put to gems on my thumb because there was still a lot of space. 
  3. Cut a part of the nail tattoo of your liking. Choose a design that has a mettallic finish and imitates the edges/curves of a crown. Soak it into the water for 10 seconds. Pick the tattoo and place it facing your nails. Gently slide the paper on the tip of your nails. Make sure to fit the nail tattos first on the tip of your nails in order not waste a lot of product. Be sure to be quick in adjusting the tattoo if there are any misalignments because the tattoo stick into the nails really fast.
  4. For the accent nail, dip you ring finger into the caviar nails. This will speed up the application of pearls into the nails. Tap you your finger to remove the excess caviar pearls.
  5. Press the decorations really hard to ensure that they won't fall easily. Apply a top coat, repeat if necessary. Let it dry. 
  6. Remove the glue around your nails slowly. You will see that gives a cleaner edges because the excess nail polish went on the glue, not on the skin.
  7. Have a picture of your nails and post it on Instagram! Haha! 📷


          This is the nail design I came up with. What do you think of this? If you'll remake this, please tag me on Instagram so I could see your creation. It looks hard to do, but it's super easy. It doesn't a professional skill to do this design. Just choose the right items and you'll end into something amazing. 😃


          If you enjoyed this tutorial, share this post to others. Please let me know your thoughts, requests, and suggestions by leaving a comment down below. I hope you liked this nail art. Thank you so much for stoppig by and reading this post. I will talk to you again. Have a nice day. Stay safe. ❤❤

Share
Tweet
Pin
Share
No Comments


         This is my first post of the year and I am so excited! I was contacted by the Community Outreach Coordinator for Julep, Abbey Jones, (isn't that most exciting thing ever?!), asking me if I could share how I "winterize" my nails, including my nail care routine, as they are currently giving this challenge to invited bloggers and select the best post and compile it to their upcoming project. I said yes to the challenge but I wasn't able to post earlier due to my hectic schedule. Anyways, I am apologizing to Abbey for making her wait so long. I'm not sure if my this will still count, but I'm doing it anyways because I love to participate in something. :)


        I didn't have any idea on what design will I come up with this post. I didn't have any much idea on how was this blog been noticed by Julep since I don't have the greatest nail designs in the blogosphere. Seriously. Haha! What I did was I went to Julep's site and browsed for color inspirations, like what are the colors associated with winter. I live in the Philippines and we don't have winter so I don't have broad knowledge about the said season. I scanned my nail polish collection to see if I have shade fit for the winter theme. 

       I came up with a simple winterized design for my short nails. I decided to use my gray nail polish from San San called Cloudy Gray for my base. What I love about with this brand is that most of their polishes are opaque, one coat is enough.  I applied two coats for opacity. I thought that the base was a little boring so I layered it with a sheer lilac purple glittery nail polish, also from San San, called Lilac Pearl.


         The camera didn't pick the true colors very well, but you can still see some hints of micro-fine lilac purple glitters. It does have a really cute effect on the gray polish. How I wish you could see this in person. It's great! The combination fits the winter time as it sparkles like snow. Haha! Geez, I'm just imagining a snow on my skin. How does it feel, guys?


        To accentuate my nails, I have pressed some nails glitters and  white star design on my ring fingers. I picked up the pentagon blue and silver glitters as it perfect for winter. You don't need any special product to make these cuties stick on your nails. As long as the nail polish is still wet, these will hold on. I finish this off with a color less polish. P.S. I cleaned the mess right after taking a shot of my nails.


The products I used:
  • San San Nail Polish in Cloudy Grey - exclusive at HBC stores
  • San San Nail Polish in Lilac Purple - exclusive at HBC stores
  • Nails To Go in Colorless - grocery stores
  • Nail glitter designs - department stores

       What do you think about this design? Please let me know if you have recreated this. Tag me a picture on Facebook,  Instagram or Twitter. My links are always at the sidebar. 

       Thank you so much to Julep for giving me the chance to participate. I might not be picked but I'm still happy because I know this opportunity does not come always. I'm already joyous by just joining. :)

     I hope you like this post. If you have any suggestions, questions, or something please hit a comment. I love reading your messages. I will talk to you soon. Have a nice day. XOXO 


Share
Tweet
Pin
Share
No Comments
           Hi! How are you doing, guys? :)  I'm back with another Nail of the Week post featuring my easy and simple nail art for short nails. Actually, I didn't go to any parties this week. I just wanted to wear glittery nails because they are really fun to look at. My classmate at the graduate school took a picture of my digits yesterday because she'e glitter lover too. Haha! What I love about this is that you can create different color combinations, go crazy about the finished look and quick to achieve if you don't have much time to prepare for a party. I know, we all have that on emergency wherein you have attend some event that was not in your plan for that particular day. So here I am to rescue you. ;) 


Steps on how I did this:
1. Of course, I applied a base coat.
2. I chose a pale mocha in frosty texture as the bottom color. 
3. Then I took a navy blue nail polish and used it as a tip. I applied it until at the middle of my nails to have a nice contrast. Like light vs. dark. 
4. I applied a top coat after and let it dry for a couple of minutes.
5. I took my nails polish with silver micro-glitters and stars. Since I was not yet quite satisfied with the look, I took my sheer beige nail polish with iridescent micro-glitters and pentagon-shaped dots. 
6. Lastly, I finished this with a top coat.  


Products used:
*Chic Nail Color in Frosty Mocha (10 mL)
*San San Nail Polish in Blue Sapphire
*Mini Calar Nail Enamel (Silver Glitters) - a Thai brand
*Bobbie Premium Nail Creme in Star Gazer (Glaze) (8mL)

          I hope you like this nail art. You don't have to use the products that I showed, especially if you don't have the access to them. I'm sure there are polishes that look similar with these on your local markets. I apologize if my camera didn't capture well my nails. Please let me know if you have any requests or thoughts. Thank you so much for reading. Have a great day. Stay safe. XOXO

____________________________________________________________________________
Join my current giveaway: 
☃✉❅_Happy Holidays Giveaway 2014_☃✉❅ Win a Red Clutch with Surprise Goodies Inside!!!
________________________________________________________________________________

Share
Tweet
Pin
Share
1 Comments
                    Love is in the air, I see hearts everywhere. Valentine's Day is coming up -- within two days to be exact. Isn't it exciting? :) Haha! For the first time in my 21 years of existence, I got so excited for the V-day. What's up with me? Hmmm. :) Anyways, I was able to do my nails yesterday and I came up with a simple nail art that I will be wearing for the big day. I bought my outfit like a ago, I might post an outfit of the day. I'm sorry if this is the only post I have for the season of love, I had many ideas but they were not put into action. My apologies. ^_^


This is the final design I came up with.
             As I have said, my finished work is simple, I just added some nail decorative stones. Red is too mainstream for Valentine's day so I opted for pink. Who's with me? Haha! Pink gives a youthful and lively vibe, like what I'm feeling right now. :D I used a Barbie pink color as a base for my nail art. You can use any shade of pink that you like if you decided to try/re-create this design.


          To be a little bit different than the usual, I have put the nail decorations only on my thumbs and pinky fingers. These stones were actually posted on my What I Got For The Holidays post. If you are interested on where did get these, please visit the linked post. :) I placed that stones in a completely random order. As you can see, I filled up the whole space of a finger to make those selected to stand out. The decorations are reflective in person, my camera didn't give justice to the beauty of these.  


            Since the remaining fingers are pretty plain, I coated those with frosted lilac color. It's the Lilac Pearl from San San, which was was featured on my Purple Fantasy nail of the week post. Two coats for intensified reflection. 


Final look. :)
Tips:
1. Let the base color dry for 20 minutes for a flawless canvas.
2. When the base had dried, put a top coat. Then put the stones in order that you like. press it hard enough to make it stay intact for at least a week.
3. Two coats of top coat over the decorations for longevity.
4. The nail art will last long depending on how careful you are. :)

 Products used:

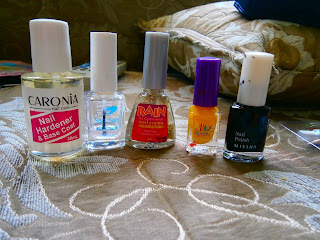
  • Caronia Nail Hardener and Base Coat - department stores, grocery stores, beauty shops
  • BK 08 (Pink) Blueberry - online shops
  • Nail Art Stones - Chinese boutiques, online shops
  • San San Nail Polish in Lilac Pearl - HBC
  • My Polish Top Coat - beauty stores

Is this post helpful? Did you like my work? Please let me know by leaving a comment. I hope you enjoyed this post. Talk to you soon. Have a great day. Stay safe. XOXO with lots of love.


Share
Tweet
Pin
Share
No Comments
               Hello there, my lovelies! I'm sorry, I was inactive for a while I was busy with doing my important businesses and I just had my internet connection last week. Yeah, I'm back at our home here in Iloilo. So, last Wednesday was my birthday, August 7. And if you are curious, I'm now 21. Woohoo! :D 

               For my big day, I decided to have a simple nail art inspired by the colors (yellow and black) of my house at Hogwarts, the Hufflepuff. I was sorted to Hufflepuff at Pottermore and my username is HeartWitch2443. I have done this little thing to support my house. :) 


             Since I don't have any badger decoration for my nails, I used flowers instead. Wanna know how I did this? Then, read on..

              I used these:


               Before anything else, clean your nails and apply a base coat. Then put on a yellow nail polish. I applied 2 coats because mine was pretty sheer.


               Using a nail art brush, I've drawn vertical lines on my nails with a black polish. As you can see, mine's not perfect. I know you can do this much better than me. :D


               Since my striped nails look like Halloween, I covered it with a glitter nail polish in order to lessen the attention that will given to lines. 


               I pressed some yellow flower decorations on my nails. These cuties will stick on the polish as long as  it's still wet. Just be careful not to ruin your lines. Lastly, apply a top coat, a little bit thick so the decorations won't be removed easily. 


               And, that's pretty much it. It's not difficult at all. If try this nail art, please send me pictures through my twitter or instagram. My links are on the left sidebar. I don't if I will be doing a birthday haul. What do you think, guys? Let's just see about that. Anyways, before I end this post I just want to share some pictures during my birthday dinner. 


               I hope you like this post. I love comments! :) I'm gonna go now. Talk to you soon. Have a nice day! :D XOXO


Share
Tweet
Pin
Share
2 Comments
Older Posts

Sylden Christine Hena

Sylden Christine Hena

Follow Delightful Illusions

My Socials

  • facebook
  • twitter
  • instagram
  • instagram
  • pinterest
  • youtube

Follow me on Instagram!

Popular Posts

  • 3 Ways To Use Calamansi (Calamondin)
                Calamansi , or Calamondi n (for other countries), is widely used in different fields. It's like a small version o...
  • First Impressions Review: Beauty Fix Peel-Off Mask Oil-Control and Detoxify (Taglish)
              Hi! Today, I'll be doing a First Impressions Review this Peel-Off Mask from Beauty Fix. I was browsing some beauty products a...
  • Glam Works Permanent Hair Dye + Routine
              I'm one those people who have had gray hair at a very young age. I inherited this condition from my dad's side. I remembe...

Affiliate

Recent Posts

Blog Archive

Contact Me

Name

Email *

Message *

Disclaimer

Some posts may contain affiliate links. I will get a commission each time you purchase through the link.

Visits

Created with by ThemeXpose | Free Blogger Templates